08 October 2010

Chinese Broccoli Pizza


Chinese Broccoli Pizza

I love Chinese broccoli (gai lan) - maybe as much as I love broccoli rabe. And neither can be found anyway around where I live. If I drive 90 minutes, I can get gai lan on Thursdays, but that's about it. So, I grew my own.

My first exposure to Chinese broccoli was when I lived in Melbourne. Although I lived in the 'Italian section' of Carlton, my local greengrocer was loaded with Asian vegetables as well. Since I recognized none of them and had no idea what to do with them, I asked the owner and he would recommend things from time to time. Instead of recommending them by flavor, he would recommend them by the health benefit they were meant to provide - low blood pressure, joints, heart health, etc. It was many years ago, but I think Chinese broccoli was meant to thin the blood.

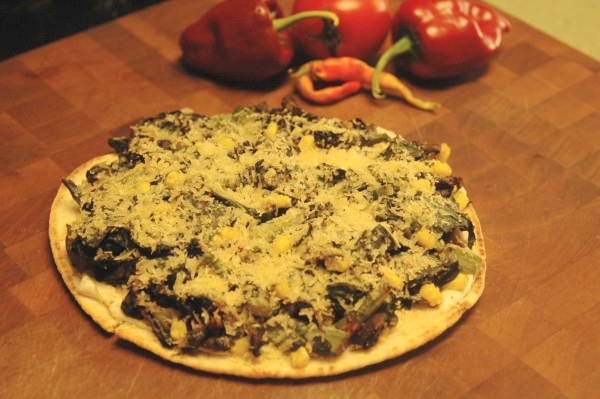
In any event, I was smitten and I'm still smitten with it. I've never seen another Chinese broccoli pizza, but if you try this, I'm confident you'll add it to your repertoire. It is easy to make, and low in added fats and calories compared to most pizzas. I used naan for the base since I have 20 of them in the freezer... A whole naan has about 300 calories and each one will feed 2 people. 

Chinese Broccoli Pizza
2 servings

1 naan
4 stalks or so of Chinese broccoli, rinsed
1 portabella mushroom cap, chopped
1/3 c corn kernels, fresh or frozen
1/8 tsp fresh thyme leaves (leaves from one or two branches only)
1 tsp black bean and garlic
sauce
1 tsp sambal oulek (optional)
1/2 tsp salt (optional)
1 Tbs olive oil
2 Tbs Vegan garlic & herb cream cheese
1 oz Cheezly Garlic Herb flavored vegan cheese, grated

Preheat oven to 400F.
Start a pot of water for your steamer basket.
Preheat a medium sized skillet on low.

Add the olive oil to your skillet and turn the heat to medium-low
Add the mushrooms to the skillet with optional salt
After 2 minutes, add the corn.
Saute the mushrooms until cooked and lightly browned, 3-4 minutes.
Add the thyme leaves to the mushroom- corn mixture and set aside.

Steam Chinese broccoli 8-10 minutes.
Cool broccoli and chop into 2cm pieces

Toss together in a bowl: broccoli, mushrooms, black bean sauce, sambal oulek
For each naan:
Spread the garlic and herb cream cheese lightly over the naan.
Add the Chinese broccoli mixture
Top with grated cheese

Bake for 10-15 minutes depending on your oven. Check after 10 minutes.

Slice into 4 pieces, garnish each with a dollop of vegan sour cream, if desired.


23 April 2010

Not Johnny Carino's Artichoke Angel Hair Pasta


Ok, so I was in Texas for my daughter's wedding and we were going to the groom's parent's house for the rehearsal dinner. I had never met his parents, and had no reason to expect ANYTHING remotely edible for a vegan. I was thinking 37 kinds of barbecue,and very bad Texas beer. The beer part was right, at least that night, but there were actually three things I could eat! Amazing.

They had taken one of the Caesar salads and left it undressed with dressing on the side. They had a veggie-corkscrew pasta salad that was pretty good. And then they had Johnny Carino's Artichoke Angel Hair Pasta. I had no idea who Johnny Carino is, but he makes one mean angel hair pasta. I later found out that it is a restaurant and the hosts had paid $14 a SERVING for it. Could I have possibly eaten $56 of PASTA? The one I had was altered from the restaurant version in that my daughter had asked them to leave out the capers.

The combination of garlic, olives, tomato, artichoke hearts and pasta was absolutely delicious.

Living in the US Midwest can have its challenges. I couldn't find any kalamata olives or any real black olives at all, so had to use the canned 'black olives' made in California. These are disgustingly bad substitutes for real olives and I'm sure no country in the world would allow them except the US. But, I decided I needed them for the photo, so bought a can and used them. Of course, now I found real olives and will use those in the future.

Another problem is that apparently during the winter and spring, the US gets nearly all of its tomatoes from Florida. And Florida decided to freeze one day. Tomatoes are hard to find and very expensive until the summer crops come in. So, I used sun-dried tomatoes in this recipe. I dry my own, but you want proper dried tomatoes, not the stuff soaked in oil or marinated. Just simple dried tomatoes.

If you are in a real rush, you can use a jar or two of marinated artichoke hearts instead of cooking your own and marinating them. However, the marinade for artichokes is very strong and you'd need to make sure you remove as much of it as possible from the artichokes. You can do the frozen ones in 15 minutes of total time, so use them if you can.

Other possible substitutions: if you don't have sumac, add a couple of scrapes of lime zest instead. Don't have brown rice angel hair? Use any angel hair pasta you like. No aleppo pepper? Then just use some chile flakes you would put on a pizza. No Massel's? Use another vegan boullion powder.

On the beer front, at the wedding itself, I had a very good Texas beer called ZiegenBock Amber. It was made a local microbrewery which has recently been purchased by a 'big company', so hopefully they will leave it alone.

Since both Massell's and the brown rice pasta were gluten free, the recipe as I made it was gluten free. If you are cooking gluten free by necessity, though, double check all the ingredients you use.

Angel Hair Artichoke Pasta

Servings: 4

8 ounce(s) Brown Rice Angel Hair Pasta
8 ounce(s) artichoke heart, frozen
1/2 cup(s) black olive, sliced
24 gram(s) Sun Dried Tomato - slices soaked and diced
2 garlic clove diced
1 tablespoon(s) olive oil, extra virgin
1 teaspoon(s) Massel Better Boullion Powder chicken flavor
1 1/2 tablespoon(s) olive oil
3 tablespoon(s) rice vinegar
1/2 teaspoon(s) kosher salt
1/2 teaspoon(s) Sumac - powdered
1/2 teaspoon(s) Aleppo pepper (or chile flakes)

Cook frozen artichokes as the package directs.

Soak the dried tomato slices in fresh water until they soften. Reserve 1/2 c of the soaking water. Then chop finely.

While the artichokes are cooking, whisk together rice vinegar, olive oil, salt and sumac in a medium bowl.

Drain artichokes and mix into the dressing. Leave to marinate.

Start a pot of water for the pasta.

Heat a 3-4 qt saute pan.

Start boiling the pasta

Add extra virgin olive oil to saute pan.

Add garlic and stir for about 30 seconds.

Add sun dried tomato pieces and stir to coat

Remove from heat until the pasta is done.

Drain pasta, reserving 1/2 c of cooking water and 1/2c of the tomato water.

Put saute pan back on heat, add pasta water and bring to a boil.

Add Massel's powder, black olives and drained artichokes

Add pasta and stir in well. Cook about a minute until everything is warm and the pasta absorbs the liquid.

Optional: sprinkle with your favorite vegan parmesan.

Serve immediately.

01 April 2010

Tae's Avocado Spaghetti Squash


This recipe was a result of a challenge from Tae to make an avocado pasta dish. Since I have a half dozen spaghetti squash to use up, I came up with this recipe with the squash instead of pasta. Hopefully, she will approve...


Tae's Avocado Spaghetti Squash

Servings: 4

6 cup(s) spaghetti squash (one large)
1 onion, finely diced
4 chili pepper, Anaheim, roasted, peeled, seeded (or 2 problano)
1 Tbs Turmeric - Fresh, grated, optional
1 Tbs ginger root, grated
1 Tbs olive oil
1 Tbs Earth Balance Original Buttery
1 tsp sea salt
1 c black beans, canned
1 c corn, frozen
2 tomato , seeds removed then diced
1 avocado
1/2 tsp lemon juice

Roast and peel chiles. Dice them and set aside
Finely dice one onion; grate turmeric if using and ginger.
Heat skillet.
Seed and dice tomatoes. Chop avocado into small chunks. Toss tomato and avocado with 1/2 tsp lemon juice. Set aside
Add olive oil and Earth Balance to the skillet.
When the butter substitute is melted, add the chiles and onion and salt. While cooking, start squash.

Cut squash in half lengthways. Remove seeds. Place cut side down in a glass dish. Add 1/4 c of water. Cover with plastic wrap and poke several holes in it.
Microwave squash for about 10 minutes or until soft

When onions are soft, add the black beans and corn and saute 3-4 minutes until heated through.
Scrape the spaghetti squash into the pan and toss to mix and heat.

Pour the squash mixture onto a seving plate and top with the avocado-tomato mixture. Add vegan parmesan cheese if desired.


Nutritional Percentages
Calories 380
Percentage Fat 38.5
Total Fat (g) 16.25
Percentage Carbohydrates 52

Saturated Fat (g) 2.9
Percentage Protein 10.2
Cholesterol (mg) 0
Sodium (mg) 736
Total Carbohydrates (g) 49.36
Sugars (g) 0
Fiber (g) 7.13
Protein (g) 9.67

13 March 2010

Lowered Fat Vegan Brownies


Note: Revised 24 April 2010 to make this easier: increased liquid, increased baking powder, added cider vinegar, eliminated cooking of flour.

This recipe began life somewhere on the internet. Tae found it, changed it, and liked it. She passed her changed version along to me. I wanted to reduce the fat and sugar in the original recipe, so I changed it even more.

This version uses 1/2 c unsweetened applesauce in place of 1/2 c of oil . We also added mesquite powder . Mesquite powder has a cinnamon-y chocolate-y flavor that really boosts the flavor of cocoa and carob flavors. Since its flavor is very strong, use it sparingly. And, there were blueberries in the freezer, so, why not blueberries? But any berry you like will work, and leave them out completely if you want, but you might need to shorten the baking time.

While I admit that I far prefer 'real' cocoa powder to carob powder, I used carob powder and carob chips for two reasons. First, I haven't used carob in ages and wanted to re-visit it. Secondly, kids will be eating the brownies and a large portion of them could end up on the floor. Since the resident canine will definitely go food-surfing, using carob instead of chocolate and cocoa makes it safe for the dog to eat as well.

If you really want to reduce the fat more, leave out the carob chips. Leaving them out reduces the fat per brownie from 4.75g to 1.23g, and reduces the calories from 193 each to 163.


Lowered Fat Vegan Brownies
16 brownies

1 c all purpose flour
1 c fine whole wheat flour
3 Tbs flax meal
2 Tbs mesquite powder OPTIONAL
3/4 c water
3/4 c soy or almond milk
1 1/2 - 2 c sugar (see note)
1 t salt
1/2 Tbs vanilla
1 Tbs apple cider vinegar
3/4 c carob or cocoa powder
1/2 c carob or vegan chocolate chips
1/2 c unsweetened applesauce
1 1/2 t baking powder
1/2 c frozen blueberries (or your favorite) OPTIONAL

Note on sugar: If you are going to add a frosting or eat the brownies with ice cream, or whipped topping, use 1 1/2 c sugar. If you will eat them alone and like very sweet brownies, use 2c of sugar. I use raw sugar instead of white.

Preheat oven to 350F

Grease an 11x7 baking dish

Mix dry ingredients.

Mix wet ingredients.
Combine ingredients and stir as little as possible until mixed.

Spread the mixture into the prepared dish and bake for 45-60 minutes. Start checking the brownies after 45 minutes and bake until a knife comes out clean.


21 February 2010

Mulberry & Orange Flower Water Muffins


Well, the snow has been falling heavily all day and it looks like Juno the dog and I are snowbound. As soon as the city 'plows' the street, the driveway will be blocked with snow 3 feet high. I'm not sure why the city feels that scraping snow from the road into piles to block driveways is a good idea, but it does seem to be our local snow plan.

So, what's there to do other than watch the Olympics and cook? Unfortunately, there was no pre-snow run for supplies, so what we have is all we are going to have.

While looking for some Australian spices for breakfast, I noticed a small bottle of Orange Flower Water that I had purchased and never used. Since flower waters are used in baking, it made me think of muffins, which, along with bread, it pretty much the only thing I ever bake. I have blueberries in the freezer, but the orange flower water is from Lebanon and I remembered that I had dried white mulberries from Turkey in the pantry.

White mulberries are an interesting fruit. The dried fruits look like small pine cones and have a mildly sweet flavor somewhat between a raisin and a fig. They have very tiny seeds which give a very small bit of crunch. They have more protein than most fruits, and also offer anti-oxidants, vitamin C, and iron. And taste great.

The basic muffin recipe I use, from Tae, uses 1/3 c oil in it. I had some unsweetened applesauce in the pantry as well, so decided to substitute that for the oil.

Orange Flower Water is amazingly fragrant. These muffins smell amazing while you mix them, amazing while you bake them, and best of all, amazing while you eat them. The flavor is absolutely delicious and probably different from your run-of-the-mill muffin you normally make. I'm not a fan of icing, so I had mine with a squirt of Soyatoo vegan 'whipped cream'.

You can get white mulberries from Barry Farms, and the orange flower water from The Spice House.

Mulberry & Orange Flower Water Muffins

1 1/4 c all purpose flour
1/2 t cinnamon
3/4 c sugar
1 t baking soda
1 t baking powder
1/4 t salt
1/2 c dried white mulberries

3/4 c soy milk
2 t vinegar
1/2c applesauce
1 T orange flower water


Preheat oven to 350F

Spray a 12 muffin pan with non-stick cooking spray.

Combine dry ingredients
Combine wet ingredients
Mix wet ingredients into dry just until it is combined, then pour into cups. Cups will be about 3/4 full.

Bake 20-25 minutes until a toothpick comes out clean. Check after 20 minutes.

17 February 2010

Southwestern Tofurky Roast


I had apprehensions when I unwrapped my first Tofurky before last Christmas. Expecting something vaguely meat-like, I was confronted with a plastic wrapped softball. I had tried the Tofurky sliced 'smoked turkey' on sandwiches and thought it was pretty good. But a beige softball? Not a good start.

On the package there were two suggested ways to baste to Tofurky while baking it. The orange one sounded like a bad idea for a Christmas turkey, so I tried the other. Unfortunately, althoguh the 'meat' and stuffing was delicious, the basting liquid was salty and used far too much oil. The basting overpowered the quality of the roast itself.

When I had a chance to get another Tofurky at a discount, I jumped at it and now wish I had bought a lot more of them. The package says it has 5 servings, but I was able to eat one 'roast' for days.

In an attempt to add a basting liquid to the roast that was as good as the 'meat', I decided to replace most of the oil with hidden liquid flavor. I roasted some poblano chiles long enough to remove the skin and seeds. I scored the tofurky very lightly and rubbed it with a teaspoon or two of oil. Then I rubbed about a tablespoon of chipotle powder on it. The Tofurky was then wrapped in the poblano chiles and aluminum foil and then baked.

The result was a super tender, very tasty, very juicy Tofurky roast that even offered up some pan juices. Sorry, Tofurky package recipe-writer-people. I win this one big time.


Southwestern Tofurky Roast

1 Tofurky, defrosted as per manufacturers directions
3 large poblano chiles
2 tsp olive oil
1 Tbs chipotle powder

Note: if you want even less heat than a poblano, you could use 6 or so Anaheim (Hatch) chiles instead, or even regular bell peppers as long as you roast and peel them

Preheat oven to 350F

Using a gas burner or your broiler, blister the skin on the poblanos, and set them aside, covered, for 15 minutes.

Peel the poblanos and remove the stem and seeds.

With a sharp knife, carefully remove the roast from its package.

Carefully and very lightly score the roast on all sides.

Rub olive oil over roast

Rub chipotle powder over roast.

Lay out a large sheet of aluminum foil and lay one poblano in the center. Add the roast on the poblano. Drape the other two poblanos over the sides and wrap up firmly in the aluminum foil.

Wrap the entire ball in another layer of aluminum foil and put in a shallow oven proof dish.

Bake for 90 minutes.

When serving, open the foil and remove the poblanos to the side. Remove roast and slice. Serve slices over pieces of the roasted poblanos. There will be several tablespoons of 'pan drippings' in the bottom of the foil, so spoon that over the slices.

09 February 2010

Kate's Methi Curry


Day after day, Tae raved about an Indian curry that her roommate, Kate, was making for them. She called it 'Kate's Methi Curry'. I had never heard of methi and had no clue what it was. Tae said is was a fresh green herb and the recipe called for 2 bunches of it. They are living in an area with a diverse ethnic mix, and have access to an array of fresh produce that makes a snowbound Midwesterner like me drool...

After a few days, Tae emailed the recipe to me and I went in search of 'methi'. Any dish that makes Tae rave like that really has to be spectacular. I had no luck finding any source for fresh methi leaves, even online. Finding dried leaves turned out to be pretty easy. One email to the online Indian store I use, Indian Blend , and they sent me the links to various versions of methi, which turned out to be fenugreek leaves. A few days later, India Blend had dried fenugreek leaves, fresh ginger, fresh turmeric and tons of garlic sitting on my doorstep.

If you want your potatoes to hold their shape, choose yukon gold or red ones. White potatoes are fine (and what I use) but they tend to fall apart if you stir them too much.

The traditional recipe uses potatoes as the vegetable. With this recipe, I have added optional vegetables. When I last made it, I had lovely fresh Brussels Sprouts, so added those. I also had some cauliflower that needed using up, so I used the florets of half a head. You might also consider broccoli, several types of potatoes, baby onions, green beans, or whatever you like. If you aren't interested in a traditional dish, the sky is the limit.

I use fresh turmeric in this, and if you can get it, strongly advise that you use it. Be careful, because it will stain anything instantly, but is well worth the trouble. It has a totally different flavor and texture than the powdered yellow stuff in a jar. Would you make a tomato sandwich with a re-hydrated dried tomato powder instead of a ripe fresh tomato, if you had the fresh available? Fresh and dried turmeric are that different.

I cut the salt in the original recipe from 3 teaspoons to 2 teaspoons in this version. When I make it for myself, I only use a single teaspoon. There is so much flavor in this mixture, you really won't miss the salt.

There is nutritional information from Menu Magic for this recipe at the bottom but it should be used only for general guidance, and does not include the extra vegetables or the brown jasmine rice I strongly suggest you serve this over.

I made a few changes in the recipe to reflect what I had or what I had access to, so if you love the recipe, all the credit goes to Kate; if you hate it, it's my fault. This recipe is superb, and a great change from a lot of our ordinary American dinner food. I haven't met Kate, but thanks for the recipe!

Kate's Methi Curry
Servings: 6

1 onion diced
3 garlic clove minced
2 tablespoon(s) ginger root, grated
2 tablespoon(s) canola oil
3 tablespoon(s) Turmeric - Fresh grated or 2 tsp dried
1 1/2 pound(s) red potato diced
2 jalapeno finely diced
2-3 c chopped vegetables (optional: cauliflower, broccoli, eggplant, green beans, etc)
1 teaspoon(s) chili powder
1 teaspoon(s) cumin powder
1 teaspoon(s) coriander seeds, ground
2 teaspoon(s) salt
4 tablespoon(s) Fenugreek Leaves Dried - Methi

In a large non-stick pot, heat oil
Add onion and garlic and saute several minutes.
Add turmeric and potato and saute 2-3 minutes
Add all other ingredients EXCEPT the methi/ fenugreek leaves
Add 1/4 c water
Cook the curry over low medium heat until the potatoes are cooked through.
Add water 2 Tbs at a time if it starts to stick. The potatoes should NOT brown, just cook .
When paotaoes are done, add methi and another 1/4 cup of water.
Mix well and cook another 5 minutes
Serve over jasmine brown rice

*************************
Nutrition Facts
per serving Nutritional Percentages
Calories 225 Percentage Fat 22.8
Total Fat (g) 5.69 Percentage Carbohydrates 68.6
Saturated Fat (g) 0.36 Percentage Protein 7.9
Cholesterol (mg) 0 Sodium (mg) 978
Total Carbohydrates (g) 38.61

29 January 2010

Daiya Eggplant Parmigiana


This recipe is a vague offshoot of a Mario Batali recipe. In that recipe, he bakes the eggplant first before assembling the parmigiana, thus eliminating the frying step. I personally find eggplant parmigiana with fried eggplant to be far too greasy and this technique eliminates the problem.

This is a fairly simple recipe and shows the excellence of Daiya cheese to real advantage. This would also work fine with Teese vegan mozz, but I think the Daiya is as close to real mozzarella as you could get here.

The red wine in the sauce is optional, but recommended. I used a California zinfandel in this dish and it was excellent. Any dry red wine that isn't heavily oaked should work fine.

A salad goes very well with this dish. I had an organic herb salad with Amy's Tuscan salad dressing. Any of the Amy's vegan dressings would be fine, but the sharpness of their Tuscan is especially nice with this. Eggplant parmigiana has a very rich mouth feel and the vinaigrette cuts that nicely.


Daiya Eggplant Parmigiana

2 medium eggplant
salt
pepper
ground coriander
olive oil

1 small onion diced
3 cloves garlic, minced
1 serrano chile, minced, optional
1/2 t marjoram, dried
1/2t thyme, dried
1 t raw sugar
3 c vegetable juice (low sodium)
1/2 c red wine (optional)
1 t salt
1/2 c panko bread crumbs
1 c Daiya 'mozzarella' cheese
2 T vegan parmesan cheese
1 Tbs cornstarch
3 Tbs water

Preheat oven to 450F.

While oven is heating, wash and slice eggplant into 1 inch slices. If you prefer it peeled, peel before slicing.

Lay eggplant in a single layer on a baking sheet and lightly sprinkle with salt, pepper, and ground coriander seed.

Drizzle very lightly with olive oil.

Bake eggplant for about 10 minutes

While eggplant is baking, sweat onion and garlic and chile, if using, in a 2-3 qt saucepan until translucent.

Add marjoram and thyme and stir.

Add juice and red wine, if using, and bring to a low boil.

Boil juice until it is reduced by 1/3 to 1/2 of its volume, reduce to simmer.

Mix cornstarch and cold water in a small bowl.

Add to the juice and stir until juice mixture starts to thicken, maybe 30 seconds, then remove from the heat and set aside.

Remove eggplant from oven and reduce heat to 350F.

Put 1/2 the eggplant into a layer into an 8x11 pan.

Sprinkle the layer with 1/2 the Daiya cheese, half the vegan parmesan cheese and several ladles of sauce.

Make a second layer and repeat. it is not necessary to use all the sauce. Use as much as you like, but it is excellent with bread.

On top, sprinkle the panko bread crumbs. Optionally, lightly drizzle some olive oil over the top.

Bake for about 20-25 minutes until sauce is bubbling and the top is turning golden and crunchy.

Serve with a salad and plenty of good bread to sop up the sauce.

18 January 2010

Mofongo


While I don't pretend to know anything about authentic mofongo, I have read about it and it is a flavor combination that seems like a great idea. Anyone who has had plantains as tostones or plantain chips knows that these are NOT just a really big, really ugly banana. They are a starchy food that can be used from its green state with no sweetness to a totally black state with a lot of sweetness.

For this recipe, I used a plantain that was nearly yellow and just slightly green but a yellow one with some black spots would also be fine. It is very easy to make and very quick if you use canned peppers.

I add a poblano pepper under the plantain and bean to give another level of flavor. Poblano peppers have little heat to them but if you are worried, you could also roast a green or red bell pepper. If you are really in a hurry, just use some chopped red bell pepper from a jar or green chiles from a can.


Mofongo
makes 2 servings with other side dishes

2 poblano chiles (if using)
1 large plantain
5-6 cloves of garlic, unpeeled
1 c cooked beans
1/2 tsp salt
1/2 tsp cumin

Blister, peel and seed your poblano peppers, if using. Roughly chop and set aside.

Heat a stainless or hard anodized skillet over medium heat. do not use a non-stick pan. Non-stick pans can give off harmful fumes when used like this

Toss your garlic cloves onto the skillet and let them pan roast in the dry pan. Turn them every minute or so. Cook them until they are soft when squeezed with your tongs.

While the garlic is going, take your plantain and cut off both tips. Carefully, cut a slit on either side of the plantain just through the skin. Wrap in a paper towel.

Microwave about 2 minutes and check if for softness. If not soft, turn it over and microwave another minute and check. Continue until it is soft when you squeeze it.

When the garlic is soft, remove to your cutting board.

Add the beans to the skillet with the cumin and heat them.

Peel the garlic and toss them into a mixing bowl. Using your fork, smash them up. When the plantain is finished, peel it and add it to the bowl, smashing it up with the garlic. Add the salt and mix.

To serve: place chopped poblanos on the plate. Add the plantain mixture over it. Spread the plantain mixture to make a hole in the middle and add the beans. Serve with a squeeze of fresh lime.

05 January 2010

Rustic Blue Corn Tamal


I love tamales but nearly all of them have meat or lard in them, so, I learned to make my own. They are a fair bit of work but really not difficult. However, there is an easier version that Rick Bayless calls a 'rustic tamal'. These are like a 'super tamale' and are traditionally baked wrapped in banana leaves. I don't know about you, but I have never even seen a banana leaf for culinary use, so I'll stick to good old aluminum foil.

I have often seen Bobby Flay using blue corn masa on Iron Chef but have never seen anywhere to buy it. Blue corn masa is not the same as blue corn meal. Masa is dried corn which has gone through a process involving lye/wood ash and it removes the outer skin and releases some of the nutrition of the corn that would otherwise not be available to your body. I was happy to find some from NM, at Jane Butel's Cooking School.

The day the masa arrived, I had already planned to make a dish based on Missouri Native Americans' use of corn, squash and beans together in a stew. Why not mix the two ideas and have a native type stuffing for the tamal?

The Native Americans also used buffalo fat, but we're vegan here, so that is definitely out... In fact, most tamale/tamal recipes call for quit a bit of lard, which, even when you substitute vegetable shortening is, in my opinion, way too much fat. The normal recipe for this would call for at least a cup of shortening. I have trimmed that down to about 1/3 of a cup.

You only need a small winter squash for this, or you could use leftover squash. I used a Sweet Dumpling, but delicata would also be excellent in this, or Heart of Gold.


Rustic Blue Corn Tamal

dough:
2 c blue corn masa
2 c stock, divided
1 t baking powder
1/4 c shortening
2 T olive oil

Filling:
1/2 c corn kernels, fresh or frozen
1 c cooked beans, drained
1 c small winter squash
1 t salt
1 t chile powder
1/2 c Daiya cheddar cheese (optional)

Preheat oven to 375F/190C

Spray a 5x7 loaf pan with cooking spray and set aside.

Hydrate your masa by adding the masa to a mixing bowl with 1 1/4 c cool stock. Mix well so all the corn is damp. Set side 5 minutes.

Take your winter squash and cut it in half lengthways. Remove seeds and place halves cut side down on a microwavable dish.

Add 1/4 c water, cover with plastic wrap and poke 2 or 3 slits in the plastic. Microwave for about 6 minutes until fully cooked. Uncover and set aside to cool a little.

While the squash is cooking roll your masa into a ball and set on the chopping board. Add the shortening, oil and baking powder to the bowl. On a low speed, use your mixer to froth up the fats and baking powder. Add the masa back to the bowl as your beat it together, adding more cool stock as needed to keep it soft. Continue until all the masa is incorporated.

Put masa in the fridge until it is needed. Leave the mixer out.

Heat a 10 inch skillet over medium heat. Add the beans and corn and a little of the leftover stock. Take the cooked squash and using a spoon, dig out about a cup of small bites or balls of squash. When the beans are hot, add the squash, chile powder and salt, mix well, and turn off the heat.

Remove the masa from the fridge. If it has firmed up some, add a little more stock and beat it some more. Corn doesn't have gluten, so you don't have to worry about over-beating it. The masa mixture should be soft and not quite as runny as a muffin batter.

Take half the masa and put it into the loaf pan. Using the back of a silicon spatula or spoon, spread the masa all along the bottom, into the corners, and start pulling it up the sides. You want it to look like a masa bowl inside.

When you have the bottom layer, add the cheese, if using, then pour the filling into the middle of the loaf pan and spread it out. Press it down slightly so the top surface is flat.

Add the rest of the masa and spread it evenly over the top.

Cover with foil.

Bake for 30 minutes.

Reduce oven temperature to 325F, 165C and bake another 30 minutes.

Remove foil and bake another 15-30 minutes until the top feels crunchy and firm and the sides have pulled away from the pan.

Dump the loaf pan out onto a plate for easier slicing. Serve a slice over greens with garnishes of vegan sour cream, salsa, guacamole, or chopped chiles.